https://github.com/awentzonline/image-analogies

Tip revision: 066626149ccb96b0a0488ca7ea4fc992aa62b727 authored by Adam Wentz on 04 December 2016, 02:48:36 UTC
bump to 0.1.2
bump to 0.1.2
Tip revision: 0666261
README.md
neural image analogies
----------------------
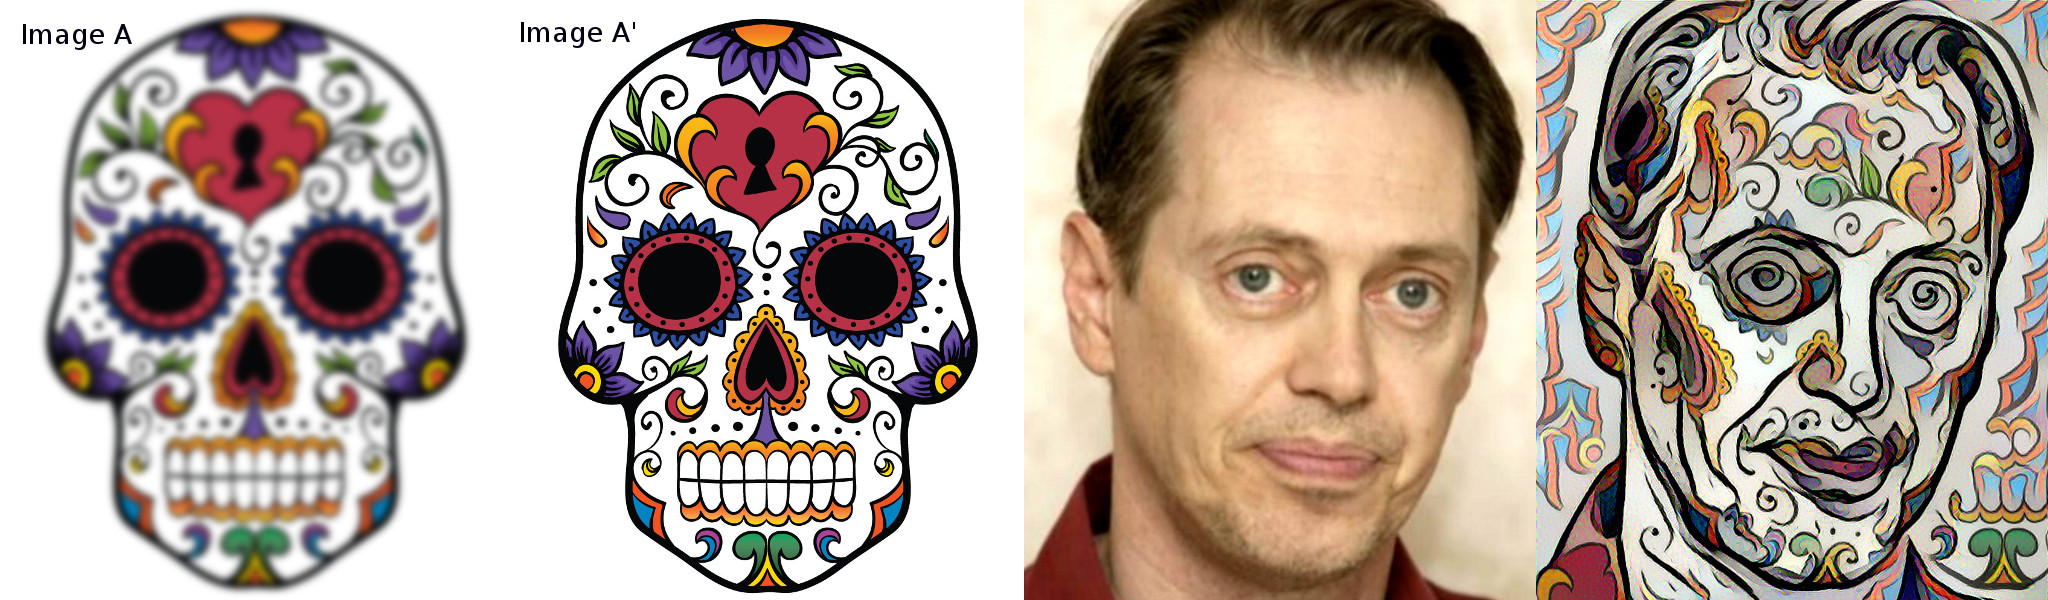
This is basically an implementation of this ["Image Analogies" paper]( http://www.mrl.nyu.edu/projects/image-analogies/index.html), In our case, we use feature maps from VGG16. The patch matching and blending is inspired by the method described in ["Combining Markov Random Fields and Convolutional Neural Networks for Image Synthesis"](http://arxiv.org/abs/1601.04589). Effects similar to that paper can be achieved by turning off the analogy loss (or leave it on!) `--analogy-w=0` and turning on the B/B' content weighting via the `--b-content-w` parameter. Also, instead of using brute-force patch matching
we use the [PatchMatch algorithm](http://gfx.cs.princeton.edu/gfx/pubs/Barnes_2009_PAR/index.php)
to approximate the best patch matches. Brute-force matching can be re-enabled by setting
`--model=brute`
The initial code was adapted from the Keras "neural style transfer" example.
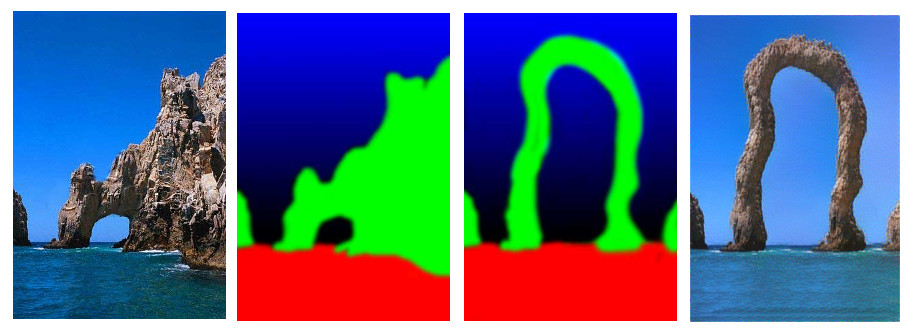
The example arch images are from the ["Image Analogies" website]( http://www.mrl.nyu.edu/projects/image-analogies/tbn.html).
They have some other good examples from their own implementation which
are worth a look. Their paper discusses the various applications of image
analogies so you might want to take a look for inspiration.
Installation
------------
This requires either [TensorFlow](https://www.tensorflow.org/versions/r0.7/get_started/os_setup.html)
or [Theano](http://deeplearning.net/software/theano/install.html). If you don't
have a GPU you'll want to use TensorFlow. GPU users may find to Theano to be
faster at the expense of longer startup times. Here's the [Theano GPU guide]( http://deeplearning.net/software/theano/tutorial/using_gpu.html).
Here's how to [configure the backend with Keras](http://keras.io/backend/) and
set your default device (e.g. cpu, gpu0).
To install via [virtualenv](https://virtualenv.readthedocs.org/en/latest/installation.html) run the following commands.
```
virtualenv venv
source venv/bin/activate
pip install neural-image-analogies
```
If you have trouble with the above method, follow these directions to [Install latest keras and theano or TensorFlow](http://keras.io/#installation)
The script `make_image_analogy.py` should now be on your path.
**Before running this script**, download the [weights for the VGG16 model](
https://github.com/awentzonline/image-analogies/releases/download/v0.0.5/vgg16_weights.h5). This file contains only the convolutional layers of VGG16 which is 10% of the full size. [Original source of full weights](https://gist.github.com/baraldilorenzo/07d7802847aaad0a35d3).
The script assumes the weights are in the current working directory. If you place
them somewhere else make sure to pass the `--vgg-weights=<location-of-the-weights.h5>` parameter or set the `VGG_WEIGHT_PATH` environment variable.
Example script usage:
`make_image_analogy.py image-A image-A-prime image-B prefix_for_output`
e.g.:
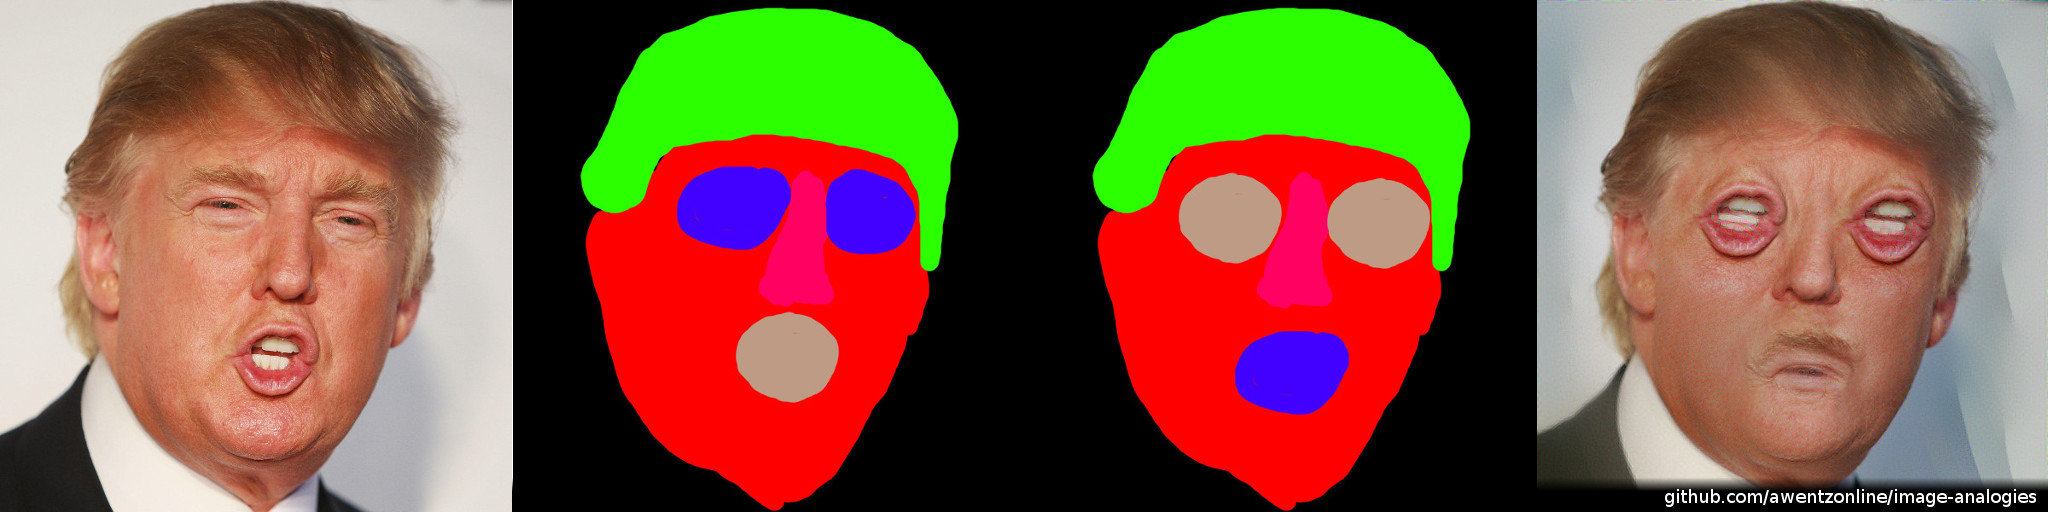
`make_image_analogy.py images/arch-mask.jpg images/arch.jpg images/arch-newmask.jpg out/arch`
The examples directory has a script, `render_example.sh` which accepts an example
name prefix and, optionally the location of your vgg weights.
`./render_example.sh arch /path/to/your/weights.h5`
Currently, A and A' must be the same size, the same holds for B and B'.
Output size is the same as Image B, unless specified otherwise.
It's too slow
-------------
If you're not using a GPU, use TensorFlow. My Macbook Pro with with can render a
512x512 image in approximately 12 minutes using TensorFlow and --mrf-w=0. Here
are some other options which mostly trade quality for speed.
* If you're using Theano enable openmp threading by using env variables `THEANO_FLAGS='openmp=1'` `OMP_NUM_THREADS=<cpu_num>`. You can read more about multi-core support [here](http://deeplearning.net/software/theano/tutorial/multi_cores.html).
* set `--mrf-w=0` to skip optimization of local coherence
* use fewer feature layers by setting `--mrf-layers=conv4_1` and/or `--analogy-layers=conv4_1` (or other layers) which will consider half as many feature layers.
* generate a smaller image by either using a smaller source Image B, or setting
the `--width` or `--height` parameters.
* ensure you're not using `--model=brute` which needs a powerful GPU
I want it to look better
------------------------
The default settings are somewhat lowered to give the average user a better chance
at generating something on whatever computer they may have. If you have a powerful GPU
then here are some options for nicer output:
* `--model=brute` will turn on brute-force patch-matching and will be done on GPU. This is Theano-only (default=patchmatch)
* `--patch-size=3` this will allow for much nicer-looking details (default=1)
* `--mrf-layers=conv1_1,conv2_1,...` add more layers to the mix (also `analogy-layers` and `content-layers`)
Parameters
----------
* --width Sets image output max width
* --height Sets image output max height
* --scales Run at N different scales
* --iters Number of iterations per scale
* --min-scale Smallest scale to iterate
* --mrf-w Weight for MRF loss between A' and B'
* --analogy-w Weight for analogy loss
* --b-content-w Weight for content loss between B and B'
* --tv-w Weight for total variation loss
* --vgg-weights Path to VGG16 weights
* --a-scale-mode Method of scaling A and A' relative to B
* * 'match': force A to be the same size as B regardless of aspect ratio (former default)
* * 'ratio': apply scale imposed by width/height params on B to A (current default)
* * 'none': leave A/A' alone
* --a-scale Additional scale factor for A and A'
* --pool-mode Pooling style used by VGG
* * 'avg': average pooling - generally smoother results
* * 'max': max pooling - more noisy but maybe that's what you want (original default)
* --contrast adjust the contrast of the output by removing the bottom x percentile
and scaling by the (100 - x)th percentile. Defaults to 0.02
* --output-full Output all intermediate images at full size regardless of actual scale
* --analogy-layers Comma-separated list of layer names to be used for the analogy loss (default: "conv3_1,conv_4_1")
* --mrf-layers Comma-separated list of layer names to be used for the MRF loss (default: "conv3_1,conv_4_1")
* --content-layers Comma-separated list of layer names to be used for the content loss (default: "conv3_1,conv_4_1")
* --patch-size Patch size used for matching (default: 1)
* --use-full-analogy match on all of the analogy patches, instead of combining
them into one image (slower/more memory but maybe more accurate)
* --model Select the patch matching model ('patchmatch' or 'brute') patchmatch is
the default and requires less GPU memory but is less accurate then brute.
* --nstyle-w Weight for neural style loss between A' and B'
* --nstyle-layers Comma-separated list of layer names to be used for the neural style
The analogy loss is the amount of influence of B -> A -> A' -> B'. It's a
structure-preserving mapping of Image B into A' via A.
The MRF loss (or "local coherence") is the influence of B' -> A' -> B'. In the
parlance of style transfer, this is the style loss which gives texture to the image.
The B/B' content loss is set to 0.0 by default. You can get effects similar
to CNNMRF by turning this up and setting analogy weight to zero. Or leave the
analogy loss on for some extra style guidance.
If you'd like to only visualize the analogy target to see what's happening,
set the MRF and content loss to zero: `--mrf-w=0 --content-w=0` This is also
much faster as MRF loss is the slowest part of the algorithm.
License
-------
The code for this implementation is provided under the MIT license.
The suggested VGG16 weights are originally from [here](https://gist.github.com/ksimonyan/211839e770f7b538e2d8) and are
licensed http://creativecommons.org/licenses/by-nc/4.0/ Open a ticket if you
have a suggestion for a more free-as-in-free-speech license.
The attributions for the example art can be found in `examples/images/ATTRIBUTIONS.md`