https://github.com/sxyu/pixel-nerf

Tip revision: 91a044bdd62aebe0ed3a5685ca37cb8a9dc8e8ee authored by Alex Yu on 10 June 2022, 06:14:01 UTC
Fixed year number
Fixed year number
Tip revision: 91a044b
README.md
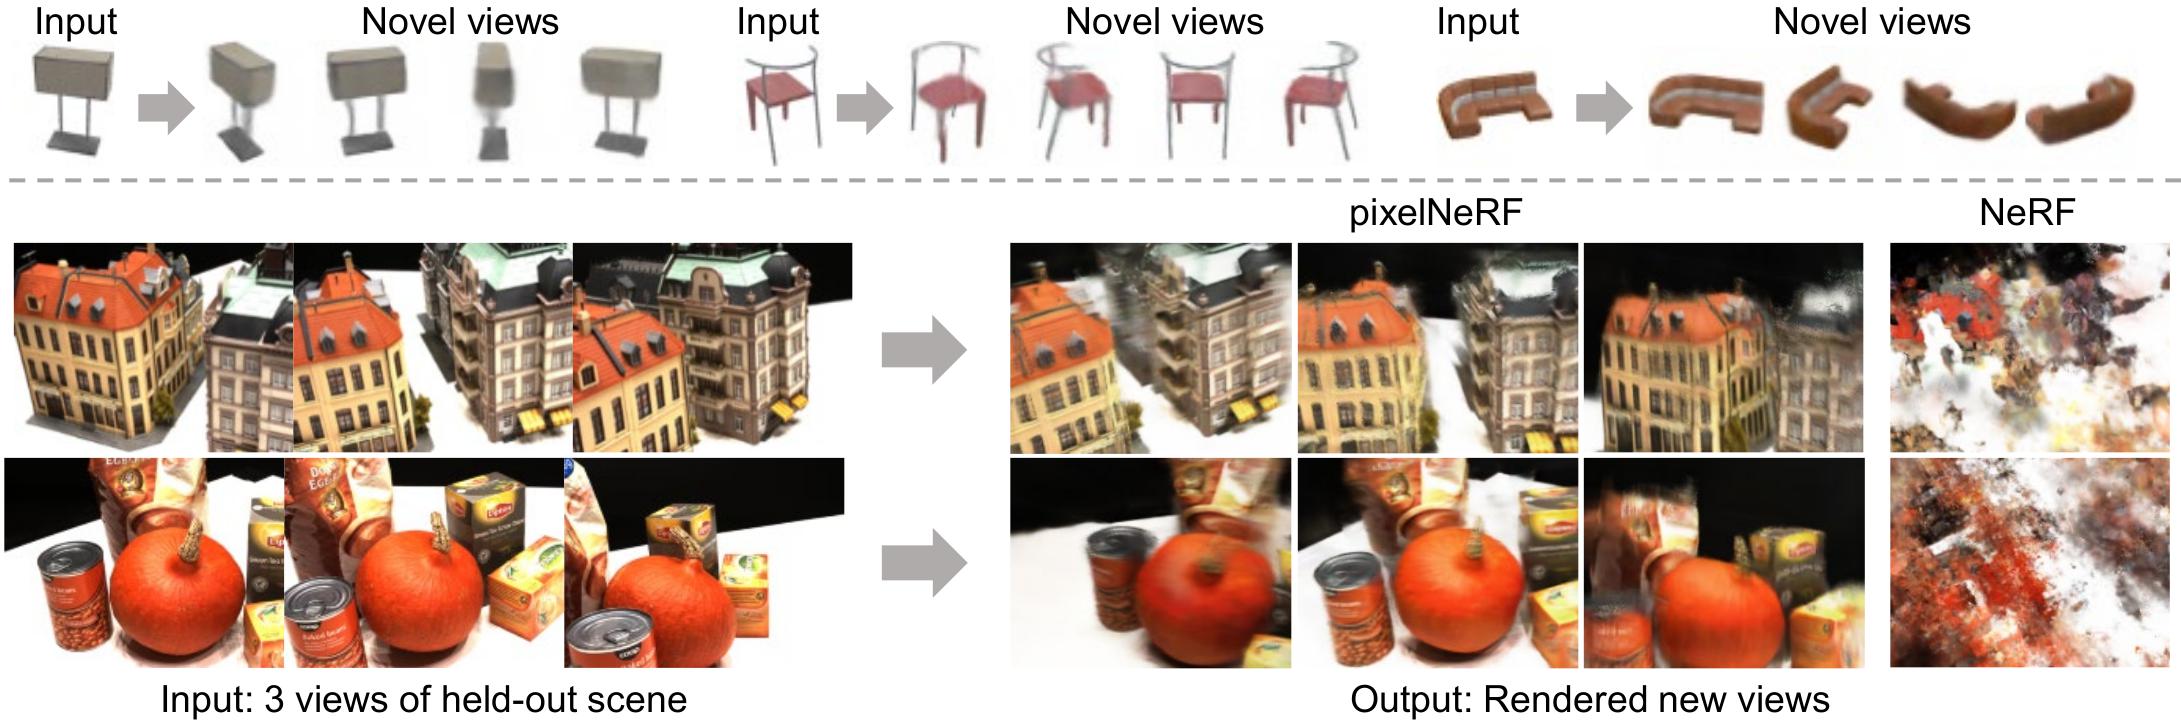
# pixelNeRF: Neural Radiance Fields from One or Few Images
Alex Yu, Vickie Ye, Matthew Tancik, Angjoo Kanazawa<br>
UC Berkeley
arXiv: http://arxiv.org/abs/2012.02190
This is the official repository for our paper, pixelNeRF, pending final release.
The two object experiment is still missing.
Several features may also be added.
# Environment setup
To start, we prefer creating the environment using conda:
```sh
conda env create -f environment.yml
conda activate pixelnerf
```
Please make sure you have up-to-date NVIDIA drivers supporting CUDA 10.2 at least.
Alternatively use `pip -r requirements.txt`.
# Getting the data
- For the main ShapeNet experiments, we use the ShapeNet 64x64 dataset from NMR
https://s3.eu-central-1.amazonaws.com/avg-projects/differentiable_volumetric_rendering/data/NMR_Dataset.zip
(Hosted by DVR authors)
- For novel-category generalization experiment, a custom split is needed.
Download the following script:
https://drive.google.com/file/d/1Uxf0GguAUTSFIDD_7zuPbxk1C9WgXjce/view?usp=sharing
place the said file under `NMR_Dataset` and run `python genlist.py` in the said directory.
This generates train/val/test lists for the experiment. Note for evaluation performance reasons,
test is only 1/4 of the unseen categories.
- The remaining datasets may be found in
https://drive.google.com/drive/folders/1PsT3uKwqHHD2bEEHkIXB99AlIjtmrEiR?usp=sharing
- Custom two-chair `multi_chair_{train/val/test}.zip`. Download splits into a parent directory and pass the parent directory path to training command.
- To render out your own dataset, feel free to use our script in `scripts/render_shapenet.py`. See `scripts/README.md` for installation instructions.
- DTU (4x downsampled, rescaled) in DVR's DTU format `dtu_dataset.zip`
- SRN chair/car (128x128) `srn_*.zip` needed for single-category exps.
Note the car set is a re-rendered version provided by Vincent Sitzmann
While we could have used a common data format, we chose to keep
DTU and ShapeNet (NMR) datasets in DVR's format and SRN data in the original SRN format.
Our own two-object data is in NeRF's format.
Data adapters are built into the code.
# Running the model (video generation)
The main implementation is in the `src/` directory,
while evalutation scripts are in `eval/`.
First, download all pretrained weight files from
<https://drive.google.com/file/d/1UO_rL201guN6euoWkCOn-XpqR2e8o6ju/view?usp=sharing>.
Extract this to `<project dir>/checkpoints/`, so that `<project dir>/checkpoints/dtu/pixel_nerf_latest` exists.
## ShapeNet Multiple Categories (NMR)
1. Download NMR ShapeNet renderings (see Datasets section, 1st link)
2. Run using
- `python eval/gen_video.py -n sn64 --gpu_id <GPU(s)> --split test -P '2' -D <data_root>/NMR_Dataset -S 0`
- For unseen category generalization:
`python eval/gen_video.py -n sn64_unseen --gpu_id=<GPU(s)> --split test -P '2' -D <data_root>/NMR_Dataset -S 0`
Replace `<GPU(s)>` with desired GPU id(s), space separated for multiple. Replace `-S 0` with `-S <object_id>` to run on a different ShapeNet object id.
Replace `-P '2'` with `-P '<number>'` to use a different input view.
Replace `--split test` with `--split train | val` to use different data split.
Append `-R=20000` if running out of memory.
**Result will be at** `visuals/sn64/videot<object_id>.mp4` or `visuals/sn64_unseen/videot<object_id>.mp4`.
The script will also print the path.
Pre-generated results for all ShapeNet objects with comparison may be found at <https://www.ocf.berkeley.edu/~sxyu/ZG9yaWF0aA/pixelnerf/cross_v2/>
## ShapeNet Single-Category (SRN)
1. Download SRN car (or chair) dataset from Google drive folder in Datasets section.
Extract to `<srn data dir>/cars_<train | test | val>`
2. `python eval/gen_video.py -n srn_car --gpu_id=<GPU (s)> --split test -P '64 104' -D <srn data dir>/cars -S 1`
Use `-P 64` for 1-view (view numbers are from SRN).
The chair set case is analogous (replace car with chair).
Our models are trained with random 1/2 views per batch during training.
This seems to degrade performance especially for 1-view. It may be preferrable to use
a fixed number of views instead.
## DTU
Make sure you have downloaded the pretrained weights above.
1. Download DTU dataset from Google drive folder in Datasets section. Extract to some directory, to get: `<data_root>/rs_dtu_4`
2. Run using `python eval/gen_video.py -n dtu --gpu_id=<GPU(s)> --split val -P '22 25 28' -D <data_root>/rs_dtu_4 -S 3 --scale 0.25`
Replace `<GPU(s)>` with desired GPU id(s). Replace `-S 3` with `-S <scene_id>` to run on a different scene. This is not DTU scene number but 0-14 in the val set.
Remove `--scale 0.25` to render at full resolution (quite slow).
**Result will be at** visuals/dtu/videov<scene_id>.mp4.
The script will also print the path.
Note that for DTU, I only use train/val sets, where val is used for test. This is due to the very small size of the dataset.
The model overfits to the train set significantly during training.
## Real Car Images
**Note: requires PointRend from detectron2.**
Install detectron2 by following https://github.com/facebookresearch/detectron2/blob/master/INSTALL.md.
Make sure you have downloaded the pretrained weights above.
1. Download any car image.
Place it in `<project dir>/input`. Some example images are shipped with the repo.
The car should be fully visible.
2. Run the preprocessor script: `python scripts/preproc.py`. This saves `input/*_normalize.png`.
If the result is not reasonable, PointRend didn't work; please try another imge.
3. Run `python eval/eval_real.py`. Outputs will be in `<project dir>/output`
The Stanford Car dataset contains many example car images:
<https://ai.stanford.edu/~jkrause/cars/car_dataset.html>.
Note the normalization heuristic has been slightly modified compared to the paper. There may be some minor differences.
You can pass `-e -20` to `eval_real.py` to set the elevation higher in the generated video.
# Overview of flags
Generally, all scripts in the project take the following flags
- `-n <expname>`: experiment name, matching checkpoint directory name
- `-D <datadir>`: dataset directory.
To save typing, you can set a default data directory for each expname in `expconf.conf` under `datadir`.
For SRN/multi_obj datasets with
separate directories e.g. `path/cars_train`, `path/cars_val`,
put `-D path/cars`.
- `--split <train | val | test>`: data set split
- `-S <subset_id>`: scene or object id to render
- `--gpu_id <GPU(s)>`: GPU id(s) to use, space delimited. All scripts except `calc_metrics.py`
are parallelized. If not specified, uses GPU 0.
Examples: `--gpu_id=0` or `--gpu_id='0 1 3'`.
- `-R <sz>`: Batch size of rendered rays per object. Default is 50000 (eval) and 128 (train); make it smaller if you run out of memory. On large-memory GPUs, you can set it to 100000 for eval.
- `-c <conf/*.conf>`: config file. *Automatically inferred* for the provided experiments from the expname. Thus the flag is only required when working with your own expnames.
You can associate a config file with any additional expnames in the `config` section of `<project root>/expconf.conf`.
Please refer the the following table for a list of provided experiments with associated config and data files:
| Name | expname -n | config -c (automatic from expconf.conf) | Data file | data dir -D |
|----------------------------|---------------|-------------------------------------------|-----------------------------------------|-------------------|
| ShapeNet category-agnostic | sn64 | conf/exp/sn64.conf | NMR_Dataset.zip (from AWS) | path/NMR_Dataset |
| ShapeNet unseen category | sn64_unseen | conf/exp/sn64_unseen.conf | NMR_Dataset.zip (from AWS) + genlist.py | path/NMR_Dataset |
| SRN chairs | srn_chair | conf/exp/srn.conf | srn_chairs.zip | path/chairs |
| SRN cars | srn_car | conf/exp/srn.conf | srn_cars.zip | path/cars |
| DTU | dtu | conf/exp/dtu.conf | dtu_dataset.zip | path/rs_dtu_4 |
| Two chairs | mult_obj | conf/exp/mult_obj.conf | multi_chair_{train/val/test}.zip | path |
# Quantitative evaluation instructions
All evaluation code is in `eval/` directory.
The full, parallelized evaluation code is in `eval/eval.py`.
## Approximate Evaluation
The full evaluation can be extremely slow (taking many days), especially for the SRN dataset.
Therefore we also provide `eval_approx.py` for *approximate* evaluation.
- Example `python eval/eval_approx.py -D <srn_data>/cars -n srn_car`
Add `--seed <number>` to try a different random seed.
## Full Evaluation
Here we provide commands for full evaluation with `eval/eval.py`.
After running this you should also use `eval/calc_metrics.py`, described in the section below,
to obtain final metrics.
Append `--gpu_id=<GPUs>` to specify GPUs, for example `--gpu_id=0` or `--gpu_id='0 1 3'`.
**It is highly recommended to use multiple GPUs if possible to finish in reasonable time.**
We use 4-10 for evaluations as available.
Resume-capability is built-in, and you can simply run the command again to resume if the process is terminated.
In all cases, a source-view specification is required. This can be either `-P` or `-L`. `-P 'view1 view2..'` specifies
a set of fixed input views. In contrast, `-L` should point to a viewlist file (viewlist/src_*.txt) which specifies views to use for each object.
Renderings and progress will be saved to the output directory, specified by `-O <dirname>`.
### ShapeNet Multiple Categories (NMR)
- Category-agnostic eval `python eval/eval.py -D <path>/NMR_Dataset -n sn64 -L viewlist/src_dvr.txt --multicat -O eval_out/sn64`
- Unseen category eval `python eval/eval.py -D <path>/NMR_Dataset -n sn64_unseen -L viewlist/src_gen.txt --multicat -O eval_out/sn64_unseen`
### ShapeNet Single-Category (SRN)
- SRN car 1-view eval `python eval/eval.py -D <srn_data>/cars -n srn_car -P '64' -O eval_out/srn_car_1v`
- SRN car 2-view eval `python eval/eval.py -D <srn_data>/cars -n srn_car -P '64 104' -O eval_out/srn_car_2v`
The command for chair is analogous (replace car with chair). The input views 64, 104 are taken from SRN.
Our method is by no means restricted to using such views.
### DTU
- 1-view `python eval/eval.py -D <data>/rs_dtu_4 --split val -n dtu -P '25' -O eval_out/dtu_1v`
- 3-view `python eval/eval.py -D <data>/rs_dtu_4 --split val -n dtu -P '22 25 28' -O eval_out/dtu_3v`
- 6-view `python eval/eval.py -D <data>/rs_dtu_4 --split val -n dtu -P '22 25 28 40 44 48' -O eval_out/dtu_6v`
- 9-view `python eval/eval.py -D <data>/rs_dtu_4 --split val -n dtu -P '22 25 28 40 44 48 0 8 13' -O eval_out/dtu_9v`
In training, we always provide 3-views, so the improvement with more views is limited.
## Final Metric Computation
The above computes PSNR and SSIM without quantization. The final metrics we report in the paper
use the rendered images saved to disk, and also includes LPIPS + category breakdown.
To do so run the `eval/calc_metrics.py`, as in the following examples
- NMR ShapeNet experiment: `python eval/calc_metrics.py -D <data dir>/NMR_Dataset -O eval_out/sn64 -F dvr --list_name 'softras_test' --multicat --gpu_id=<GPU>`
- SRN car 2-view: `python eval/calc_metrics.py -D <srn data dir>/cars -O eval_out/srn_car_2v -F srn --gpu_id=<GPU>` (warning: untested after changes)
- DTU: `python eval/calc_metrics.py -D <data dir>/rs_dtu_4/DTU -O eval_out/dtu_3v -F dvr --list_name 'new_val' --exclude_dtu_bad --dtu_sort`
Adjust -O according to the -O flag of the eval.py command.
(Note: Currently this script has an ugly standalone argument parser.)
This should print a metric summary like the following
```
psnr 26.799268696042386
ssim 0.9102204550379002
lpips 0.10784384977842876
WROTE eval_sn64/all_metrics.txt
airplane psnr: 29.756697 ssim: 0.946906 lpips: 0.084329 n_inst: 809
bench psnr: 26.351427 ssim: 0.911226 lpips: 0.116299 n_inst: 364
cabinet psnr: 27.720198 ssim: 0.910426 lpips: 0.104584 n_inst: 315
car psnr: 27.579590 ssim: 0.942079 lpips: 0.094841 n_inst: 1500
chair psnr: 23.835303 ssim: 0.857738 lpips: 0.145518 n_inst: 1356
display psnr: 24.217023 ssim: 0.867284 lpips: 0.129138 n_inst: 219
lamp psnr: 28.579184 ssim: 0.912794 lpips: 0.113561 n_inst: 464
loudspeaker psnr: 24.435302 ssim: 0.855195 lpips: 0.140653 n_inst: 324
rifle psnr: 30.597488 ssim: 0.968040 lpips: 0.065629 n_inst: 475
sofa psnr: 26.944224 ssim: 0.907861 lpips: 0.116114 n_inst: 635
table psnr: 25.591960 ssim: 0.898314 lpips: 0.098103 n_inst: 1702
telephone psnr: 27.128039 ssim: 0.921897 lpips: 0.097074 n_inst: 211
vessel psnr: 29.180307 ssim: 0.938936 lpips: 0.110670 n_inst: 388
---
total psnr: 26.799269 ssim: 0.910220 lpips: 0.107844
```
# Training instructions
Training code is in `train/` directory, specifically `train/train.py`.
- Example for training to DTU: `python train/train.py -n dtu_exp -c conf/exp/dtu.conf -D <data dir>/rs_dtu_4 -V 3 --gpu_id=<GPU> --resume`
- Example for training to SRN cars, 1 view: `python train/train.py -n srn_car_exp -c conf/exp/srn.conf -D <srn data dir>/cars --gpu_id=<GPU> --resume`
- Example for training to ShapeNet multi-object, 2 view: `python train/train.py -n multi_obj -c conf/exp/multi_obj.conf -D <parent dir of splits> --gpu_id=<GPU> --resume`
Additional flags
- `--resume` to resume from checkpoint, if available. Usually just pass this to be safe.
- `-V <number>` to specify number of input views to train with. Default is 1.
- `-V 'numbers separated by space'` to use random number of views per batch. This does not work so well in our experience but we use it for SRN experiment.
- `-B <number>` batch size of objects, default 4
- `--lr <learning rate>`, `--epochs <number of epochs>`
- `--no_bbox_step <number>` to specify iteration after which to stop using bounding-box sampling.
Set to 0 to disable.
If the checkpoint becomes corrupted for some reason (e.g. if process crashes when saving), a backup is saved to `checkpoints/<expname>/pixel_nerf_backup`.
To avoid having to specify -c, -D each time, edit `<project root>/expconf.conf` and add rows for your expname in the config and datadir sections.
## Log files and visualizations
View logfiles with `tensorboard --logdir <project dir>/logs/<expname>`.
Visualizations are written to `<project dir>/visuals/<expname>/<epoch>_<batch>_vis.png`.
They are of the form
- Top coarse, bottom fine (1 row if fine sample disabled)
- Left-to-right: input-views, depth, output, alpha.
# BibTeX
```
@inproceedings{yu2021pixelnerf,
title={{pixelNeRF}: Neural Radiance Fields from One or Few Images},
author={Alex Yu and Vickie Ye and Matthew Tancik and Angjoo Kanazawa},
year={2021},
booktitle={CVPR},
}
```
# Acknowledgements
Parts of the code were based on from kwea123's NeRF implementation: https://github.com/kwea123/nerf_pl.
Some functions are borrowed from DVR https://github.com/autonomousvision/differentiable_volumetric_rendering
and PIFu https://github.com/shunsukesaito/PIFu